Hello!! Everyone, I hope you are doing great. We already cover a few parts of basic HTML tutorials in the previous article. Now we are moving forward.
If you missed the previews part of this tutorial, then please check out the previous article on HTML Tutorials 101and Web Development.
HTML Links
The Links are specified using the <a> tag in HTML.
A link or hyperlink, it could be a word group of words or an image.
Syntax:
<a href="url">text</a>Any text between the opening of <a> tag and the closing </a> the tag becomes the part of the link that the user sees and clicks in a browser.
For example:
<a href="https://technicalblog.in/">Technicalblog</a>The href the attribute specifies the target of the link. Its value can be an absolute or relative URL.
Setting the Targets for Links
The target attribute in HTML tells the browser where to open the linked document.
There are four types of targets, and they always start with an underscore(_). The target attribute can have one of the following values:
- _blank — opens the linked document in a new window or tab.
- _parent — opens the linked document in the parent window.
- _self — opens the linked document in the same window or tab as the source document. This is the default; So, it is not necessary to explicitly specify this value.
- _top — it opens the linked document in the full browser window.
For example:
<a href="/about-us.php" target="_top">About Us</a> <a href="https://www.google.com/" target="_blank">Google</a> <a href="images/sky.jpg" target="_parent"> <img src="sky-thumb.jpg" alt="Cloudy Sky"> </a>Some other Links:
Button as a Link
For using an HTML button as a link, firstly, you have to add some JavaScript code.
JavaScript allows us to specify what happens at certain events, such as a click of a button.
For example:
<button onclick="document.location = 'default.asp'">HTML Tutorial</button>HTML Links – Image as a Link
It is a very common way to use images as links:
For example:
<a href="default.asp">
  <img src="tech.gif" alt="HTML tutorial" style="width:45px;height:45px;border:0;">
</a>
Creating Bookmark Anchors
You can create bookmark anchors to allow users to jump to a specific section of a web page. Bookmarks are especially helpful if you have a very long web page.
For example:
<a href="#sectionA">Jump to Section A</a> <h2 id="sectionA">Section A</h2> <p>Lorem ipsum dolor sit amet, consectetur adipiscing elit...</p>HTML Text Formatting

HTML provides multiple tags that you can use to make some text on your web pages to appear differently than standard text.
- <b> – Bold text
- <strong> – Important text
- <i> – Italic text
- <em> – Emphasized text
- <mark> – Marked text
- <small> – Small text
- <del> – Deleted text
- <ins> – Inserted text
- <sub> – Subscript text
- <sup> – Superscript text
Difference between <strong> and <b> tag
Both <strong> and <b> tags contribute the enclosed text in a bold typeface by default, but the <strong> tag symbolizes that its contents have substantial importance; on the other hand <b> tag is simply used to draw the reader’s concentration without sending any particular significance.
Difference between <em> and <i> tag
Similarly, both <em> and <i> tags provide the embedded text in italic type by default, but the <em> the tag indicates that its contents have stressed emphasis compared to the surrounding text. On the other hand <i> tag is used for marking up text that is set off from the normal text for readability reasons.
HTML Styles
HTML is quite finite when it comes to the presentation of a web page. But with CSS, it is elementary to use. We will discuss styling briefly in CSS. Now we are only learning style syntax and how it works in HTML.
<tagname style="property:value;">The property is a CSS property. The value is a CSS value.
For example:
The CSS color property defines the text color for an HTML element:
<h1 style="color:green">This is a green heading</h1>
<p style="color:red;">The paragraph color is red.</p>
HTML Images
Inserting Images into Web Pages
The <img> tag uses to insert images in the HTML documents. It is an empty element and also contains attributes only. The syntax of the <img> tag can be given with:
<img src="url" alt="some_text">Setting the Width and Height of an Image
We can set the width and height of the image based on your requirement using width and height attributes.
For example:
<img src="kites.jpg" alt="Flying Kites" width="300" height="300"> <img src="sky.jpg" alt="Cloudy Sky" width="250" height="150"> <img src="balloons.jpg" alt="Balloons" width="200" height="200">Using the HTML5 Picture Element
HTML5 has introduced the <picture> tag that allows us to define the multiple versions of an image to target different types of devices.
The <picture> the element contains zero or more <source> elements and each referring to the different image sources, and one <img> element at the end. Also, each <source> element has the media attribute which specifies a media condition (likewise to the media query) that is used by the browser to determine when a particular source should be used. Let’s consider as an example:
<picture> <source media="(min-width: 1000px)" srcset="logo-large.png"> <source media="(max-width: 500px)" srcset="logo-small.png"><img src="logo-default.png" alt="My logo"> </picture>HTML Tables
Creating Tables in HTML
The HTML table allows us to arrange data into rows and columns. They are commonly used to display tabular data like product listings, customer details, financial reports, and so on.
An HTML table defines with the <table> tag.
Each row of the table is defined with the <tr> tag. A header is defined with the <th> tag. By default, the table headings are bold and centered. A data/cell of the table is defined with the <td> tag.
For example:
<table style="width:100%">
  <tr>
    <th>Firstname</th>
    <th>Lastname</th>
    <th>Age</th>
  </tr>
  <tr>
    <td>Jill</td>
    <td>Smith</td>
    <td>50</td>
  </tr>
  <tr>
    <td>Eve</td>
    <td>Jackson</td>
    <td>94</td>
  </tr>
</table>

HTML Lists
There are three different types of lists in HTML, each with a specific purpose and meaning.
- Unordered list — used to create a list of related items and in no particular order.
- Ordered list — used to create a list of related items in a specific order.
- Description list — used to create a list of terms and their descriptions.
HTML Unordered Lists
An unordered list is a group of related items that have no particular order or sequence. An unordered list starts with the <ul> tag. Each list item starts with the <li> tag. HTML Unordered List or Bulleted List displays elements in a bulleted format.
<ul> <li>Coffee</li> <li>Tea</li> </ul>
HTML Ordered Lists
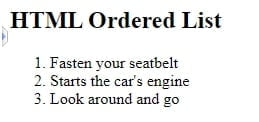
An ordered list created using the <ol> element, and each list item starts with the <li> element. Ordered lists are used mostly when the order of the list’s items is important.
For example:
<ol> <li>Fasten your seatbelt</li> <li>Starts the car's engine</li> <li>Look around and go</li> </ol>
HTML Description Lists
The HTML description List or Definition List displays elements in definition form like in dictionary. The <dl> element is used in conjunction with the <dt> element which specify a term, and the <dd> element which specify the term’s definition.
<dl> <dt>Bread</dt> <dd>A baked food made of flour.</dd> <dt>Coffee</dt> <dd>A drink made from roasted coffee beans.</dd> </dl>
HTML Layout
Websites often display content in multiple columns (like a magazine or newspapers).
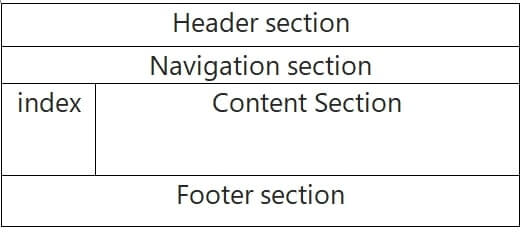
HTML offers several semantic elements that define the different parts of a web page:
- <header> – a header for a document or a section
- <nav> – a container for navigation links
- <section> – a section in a document
- <article> – an independent self-contained article
- <aside> – content aside from the content (like a sidebar)
- <footer> – a footer for a document or a section
- <details> – refers additional details
- <summary> – Defines a heading for the <details> element

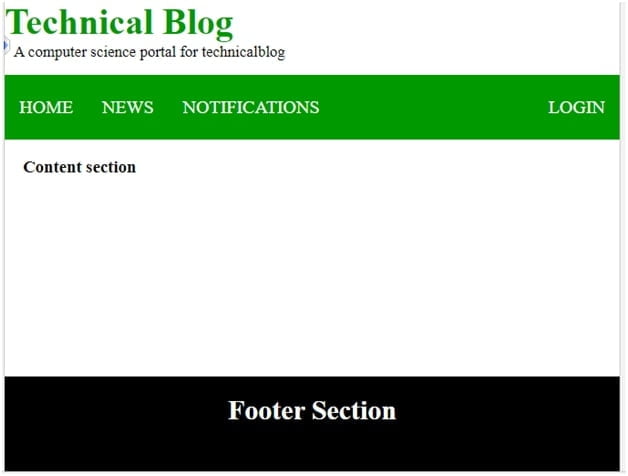
A simple Layout example for beginners:
<!DOCTYPE html>
<html>
<head>
             <title>This is Page Layout</title>
	<style>
		.head1 {
			font-size:50px;
			color:#009900;
			font-weight:bold;
		}
		.head2 {
			font-size:18px;
			margin-left:11px;
			margin-bottom:15px;
		}
		body {
			margin: 0 auto;
			background-position:center;
			background-size: contain;
		}
                         .menu {
			position: sticky;
			top: 0;
			background-color: #009900;
			padding:10px 0px 10px 0px;
			color:white;
			margin: 0 auto;
			overflow: hidden;
		}
		.menu a {
			float: left;
			color: white;
			text-align: center;
			padding: 14px 16px;
			text-decoration: none;
			font-size: 20px;
		}
		.menu-log {
			right: auto;
			float: right;
		}
		footer {
			width: 100%;
			bottom: 0px;
			background-color: #000;
			color: #fff;
			position: absolute;
			padding-top:20px;
			padding-bottom:50px;
			text-align:center;
			font-size:30px;
			font-weight:bold;
		}
		.body_sec {
			margin-left:20px;
		}
	</style>
</head>
<body>
	<header>
		<div class="head1">Technicalblog</div>
		<div class="head2">This is a computer science portal for technicalblog</div>
	</header>
	<div class="menu">
		<a href="#home">HOME</a>
		<a href="#news">NEWS</a>
		<a href="#notification">NOTIFICATIONS</a>
		<div class="menu-log">
			<a href="#login">LOGIN</a>
		</div>
             </div>
	<!-- Body section -->
	<div class = "body_sec">
		<section id="Content">
			<h3>Content section</h3>
		</section>
	</div>
	<!-- Footer Section -->
	<footer>Footer Section</footer>
</body>
</html>

In this article, we are completed our Basic part of the HTML Tutorial, and now, we will move to our Advanced part of the HTML Tutorial.
For any doubt feel free to comment. html tutorials
HTML tutorials, HTML tutorials, HTML tutorials