Hello everyone, we are back again with a new article on tutorials on CSS3 Tutorials. Here we will start from where we finished in the previous article. In this, we are going to cover the new elements of CSS3 of the CSS3 Tutorial.
If you missed the previous article then check once CSS Tutorial 106.
CSS3 Features
| What’s inside: Gradients Text Overflow Drop Shadows 2D Transforms FAQS |
CSS3 Gradients
CSS gradients using for display smooth transitions between two or more specified colours. This is the most important topic of CSS3.
OR
Gradients are CSS elements of the image data type that show a transition between two or more colors. The very popular use for gradients would be in a background element.
There are two types of gradients:
- Linear Gradients (goes up/down/left/right/diagonally)
- Radial Gradients (defined by their center)
CSS Linear Gradients
For starting a linear gradient, we must have at least two color stops. Transitions in linear gradients occur through a straight line determined by an angle or direction. A CSS linear gradient can be coded by using the linear-gradient() function, and it can be as simple or complex as we would like.
Syntax
background-image: linear-gradient(direction, color-stop1, color-stop2, ...);For example:
background-image: linear-gradient(90deg, #020024 0%, #090979 35%, #00d4ff 100%);
Linear Gradient – Top to Bottom
The below-mentioned example shows how to create a linear gradient from top to bottom.
For example:
<!DOCTYPE html>
<html>
<head>
<style>
#grad1 {
  height: 200px;
  background-color: blue;
  background-image: linear-gradient(blue, yellow);
}
</style>
</head>
<body>

<h1>Linear Gradient - Top to Bottom</h1>
<p>This linear gradient starts at the top. It starts blue, transitioning to yellow:</p>

<div id="grad1"></div>
</body>
</html>
Linear Gradient – Top to Bottom
This linear gradient starts at the top. It starts blue, transitioning to yellow:
Linear Gradient – Left to Right
The following example will create a linear gradient from left to right.
For example:
<!DOCTYPE html>
<html>
<head>
<style>
#grad1 {
  height: 200px;
  background-color: red;
  background-image: linear-gradient(to right, blue , yellow);
}

</style>
</head>
<body>

<h1>Linear Gradient - Left to Right</h1>
<p>This linear gradient starts at the left. It starts blue, transitioning to yellow:</p>

<div id="grad1"></div>
</body>
</html>
Linear Gradient – Left to Right
This linear gradient starts at the left. It starts blue, transitioning to yellow:
Linear Gradient – Diagonal
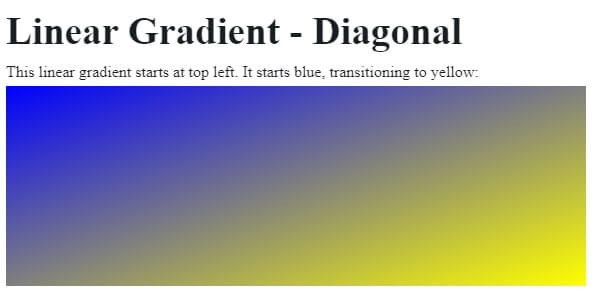
We can also create a gradient along the diagonal direction. The following example will create a linear gradient from the bottom left corner to the top right corner of the element’s box.
For example:
<!DOCTYPE html>
<html>
<head>
<style>
#grad1 {
  height: 200px;
  background-color: blue;
  background-image: linear-gradient(to bottom right, blue, yellow);
}
</style>
</head>
<body>

<h1>Linear Gradient - Diagonal</h1>
<p>This linear gradient starts at top left. It starts blue, transitioning to yellow:</p>

<div id="grad1"></div>
</body>
</html>
Setting Direction of Linear Gradients Using Angles
If we want more control over the direction of the gradient. Then we can set the angle instead of the predefined directions (to bottom, to top, to the right, to the left, to bottom right, etc.). The angle 0deg creates a bottom to the top gradient, and positive angles represent clockwise rotation. This means the angle 90deg creates a left to the right gradient.
Syntax:
background-image: linear-gradient(angle, color-stop1, color-stop2);The example will create a linear gradient from left to right using angle.
For example:
<!DOCTYPE html>
<html>
<head>
<style>
#grad1 {
  height: 100px;
  background-color: red;
  background-image: linear-gradient(0deg, red, yellow);
}

#grad2 {
  height: 100px;
  background-color: red;
  background-image: linear-gradient(90deg, red, yellow);
}

#grad3 {
  height: 100px;
  background-color: red;
  background-image: linear-gradient(180deg, blue, white);
}

#grad4 {
  height: 100px;
  background-color: red;
  background-image: linear-gradient(-90deg, blue, white);
}

</style>
</head>
<body>

<h1>Linear Gradients - Using Different Angles</h1>

<div id="grad1" style="text-align:center;">0deg</div><br>
<div id="grad2" style="text-align:center;">90deg</div><br>
<div id="grad3" style="text-align:center;">180deg</div><br>
<div id="grad4" style="text-align:center;">-90deg</div>
</body>
</html>
Linear Gradients – Using Different Angles
Creating Linear Gradients Using Multiple Color Stops
We can also create gradients for more than two colors. The below-mentioned example shows how to create a linear gradient using multiple color stops. All colors are evenly spaced.
For example:
<!DOCTYPE html>
<html>
<head>
<style>
#grad1 {
  height: 200px;
  background-color: red;
  background-image: linear-gradient(red, yellow, green);
}

.grad2 {
  height: 200px;
  background-color: red;
  background-image: linear-gradient(red, orange, yellow, green, blue, white, violet);
}

#grad3 {
  height: 200px;
  background-color: red;
  background-image: linear-gradient(red 10%, green 85%, blue 80%);
}

</style>
</head>
<body>

<h1>Linear Gradients - Multiple Color Stops</h1>

<h3>3 Color Stops (evenly spaced):</h3>
<div id="grad1"></div>

<h3>7 Color Stops (evenly spaced):</h3>
<div class="grad2"></div>

<h3>3 Color Stops (not evenly spaced):</h3>
<div id="grad3"></div>
</body>
</html>
Linear Gradients – Multiple Color Stops
3 Color Stops (evenly spaced):
7 Color Stops (evenly spaced):
3 Color Stops (not evenly spaced):
Repeating the Linear Gradients
We can repeat linear gradients using the repeating-linear-gradient() function.
Example:<!DOCTYPE html>
<html>
<head>
<style>
#grad1 {
height: 200px;
background-color: red;
background-image: repeating-linear-gradient(blue, yellow 10%, green 20%);
}
#grad2 {
height: 200px;
background-color: red;
background-image: repeating-linear-gradient(45deg,blue,yellow 7%,green 10%);
}
#grad3 {
height: 200px;
background-color: red;
background-image: repeating-linear-gradient(190deg,blue,yellow 7%,green 10%);
}
#grad4 {
height: 200px;
background-color: red;
background-image: repeating-linear-gradient(90deg,blue,yellow 7%,green 10%);
}
</style>
</head>
<body>
<h1>Repeating Linear Gradient</h1>
<div id="grad1"></div>
<p>A repeating gradient on 45deg axe starting blue and finishing green:</p>
<div id="grad2"></div>
<p>A repeating gradient on 190deg axe starting blue and finishing green:</p>
<div id="grad3"></div>
<p>A repeating gradient on 90deg axe starting blue and finishing green:</p>
<div id="grad4"></div>
</body>
</html>Repeating Linear Gradient
A repeating gradient on 45deg axe starting blue and finishing green:
A repeating gradient on 190deg axe starting blue and finishing green:
A repeating gradient on 90deg axe starting blue and finishing green:
Creating CSS3 Radial Gradients
Radial gradient color appears from a particular point and smoothly spread outward in a circular or elliptical shape, preferably than fading from one color to another in a single direction as with linear gradients.
Syntax:
background-image: radial-gradient(shape size at position, start-color, ..., last-color);The arguments of the function has the following meaning:
- Position — This works the same way it does on background-position, so key-words like “top,” “right,” “left,” and “center” will work here, which can be specified in units (px, em, or percentages) or key-word (left, bottom, etc.).
- Shape — it determines the shape of the gradient, and since we’re talking about radial gradients, they’re limited to being circular in nature. Your shapes will be between an ellipse or a circle.
- Size — refers influences the ending shape of the gradient by taking your shape value you determined and instructing the gradient where to end. You can use key-words like closest-side, farthest-side, closest-corner, and farthest-corner.
The following example will show you create a radial gradient with evenly spaced color stops.
For example:
<!DOCTYPE html>
<html>
<head>
<style>
#grad1 {
  height: 150px;
  width: 200px;
  background-color: blue;
  background-image: radial-gradient(blue, yellow, green);
}
</style>
</head>
<body>
<h1>Radial Gradient - Evenly Spaced Color Stops</h1>
<div id="grad1"></div>
</body>
</html>
Radial Gradient – Evenly Spaced Color Stops
Setting the Size of Radial Gradients
The size argument of the radial-gradient() the function is used to define the size of the gradient’s ending shape. It can be set using units or the keywords: closest-side, farthest-side, closest-corner, farthest-corner.
For example:
<!DOCTYPE html>
<html>
<head>
<style>
#grad1 {
  height: 150px;
  width: 150px;
  background-color: red;
  background-image: radial-gradient(closest-side at 50% 45%, red, yellow, blue);
}

#grad2 {
  height: 150px;
  width: 150px;
  background-color: red;
  background-image: radial-gradient(farthest-side at 50% 45%, red, yellow, blue);
}

#grad3 {
  height: 150px;
  width: 150px;
  background-color: red;
  background-image: radial-gradient(closest-corner at 60% 55%, red, yellow, blue);
}

#grad4 {
  height: 150px;
  width: 150px;
  background-color: red;
  background-image: radial-gradient(farthest-corner at 60% 55%, red, yellow, blue);
}

</style>
</head>
<body>

<h1>Radial Gradients - Different size keywords</h1>

<h2>closest-side:</h2>
<div id="grad1"></div>

<h2>farthest-side:</h2>
<div id="grad2"></div>

<h2>closest-corner:</h2>
<div id="grad3"></div>

<h2>farthest-corner (default):</h2>
<div id="grad4"></div>
</body>
</html>
Radial Gradients – Different size keywords
closest-side:
farthest-side:
closest-corner:
farthest-corner (default):
CSS3 Text Overflow
The text-overflow property in CSS deals with situations. Where the text is clipped when it overflows the element’s box. It could be clipped (i.e. cut off, hidden), display an ellipsis (‘…’, Unicode Range Value U+2026). Or display an author-defined string (there is no current browser support for author-defined strings).
Hiding Overflow Text
Set the div including a width, (otherwise it won’t know what overflow is). Then, the CSS set to overflow: hidden; Remember to position the element relative (position: relative). So, IE knows how to deal with it. use text-overflow: ellipsis;
We can either display or clip the overflowed text or clip and display an ellipsis or a custom string in the palace of the clipped text to indicate the user.
The Values, which are accepted by the word-break property are: clip and ellipsis and string.
p {
    width: 400px;
    overflow: hidden;
    white-space: nowrap;
    background: #cdcdcd;
}

p.clipped {
    text-overflow: clip; /* clipped the overflowed text */
}
p.ellipses {
    text-overflow: ellipsis; /* display '…' to represent clipped text */
}
Breaking Overflow Text
We can also break a long word and force it to wrap onto a new line that overflows the boundaries of containing elements using the CSS3 word-wrap property.
The Values, which are accepted by the word-wrap property are: normal and break-word.
For example:
p {
    width: 200px;
    background: #ffc4ff;
    word-wrap: break-word;
}
Note: Please check out the individual property reference for all the possible values and the Browser support for these CSS properties.
Specify Word Breaking Rules
To specify the word breaking rules in CSS3, use the word-break property. This property is used to break the line. Possible values are included the normal, break-all, keep-all, break-word, etc.
Following is the code for specifying word breaking rules using CSS3 −
For example:
p {
    width: 150px;
    padding: 10px;
}
p.break {
    background: #bedb8b;

    word-break: break-all;
}
p.keep {
    background: #f09bbb;
    word-break: keep-all;
}
CSS3 Drop Shadows
CSS3 helped to add shadow to text or elements. Shadow property has divided as follows −
- Text shadow
- Box Shadow
Text shadow
CSS3 helped to add shadow effects to text. there is an example for adding text-shadow effects to text−
<html>
   <head>
      <style>
         h1 {
            text-shadow: 2px 2px;
         }
         h2 {
            text-shadow: 2px 2px red;
         }
         h3 {
            text-shadow: 2px 2px 5px red;
         }
         h4 {
            color: white;
            text-shadow: 2px 2px 4px #000000;
         }
         h5 {
            text-shadow: 0 0 3px #FF0000;
         }
         h6 {
            text-shadow: 0 0 3px #FF0000, 0 0 5px #0000FF;
         }
         p {
            color: white;
            text-shadow: 1px 1px 2px black, 0 0 25px blue, 0 0 5px darkblue;
         }
      </style>
   </head>

   <body>
       <h1>Technicalblog</h1>
      <h2>Technicalblog</h2>
      <h3>Technicalblog</h3>
      <h4>Technicalblog</h4>
      <h5>Technicalblog</h5>
      <h6>Technicalblog</h6>
      <p>Technicalblog</p>
   </body>
</html>

CSS3 box-shadow Property
The box-shadow feature can be applied to add shadow to the element’s boxes. You can also apply more than one shadow effect using a comma-separated list. The basic syntax of creating a box-shadow can be given with: box-shadow: offset-x offset-y blur-radius color;
The components of the box-shadow property have the following meaning:
- offset-x — it sets the horizontal offset of the shadow.
- offset-y — the offset-y sets the vertical offset of the shadow.
- Blur-radius — Sets the blur radius. The larger the value, the bigger the blur and more the shadow’s edge will be blurred. Negative values are not allowed.
- Colour — it sets the color of the shadow. If the color value is omitted or not specified, it takes the value of the color property.
Also, See the CSS3 box-shadow property to learn more about this.
For example:
.box{
    width: 200px;
    height: 150px;
    background: #ccc;
    box-shadow: 5px 5px 10px #999;
}
CSS3 2D Transforms
CSS3 2D changes are used to re-change the element structure as translate, rotate, scale, and skew.
Using CSS Transform and Transform Functions
The transform The property of CSS3 uses the transform functions to manipulate the coordinate system used by an element in order to apply the transformation effect.
The translate() Function
Move the component of its current position to a new position along the X and Y axes. This can be written as translate(tx, ty). If ty isn’t specified, its value is assumed to be zero.
For example:
<!DOCTYPE html>
<html lang="en">
<head>
<meta charset="utf-8">
<title>Example of CSS3 translate() Method</title>
<style>
    img {
		-webkit-transform: translate(200px, 50px);
			transform: translate(200px, 50px);  /*Standard syntax */
	}
    .box{
        margin: 50px;
        width:153px;
        height:103px;
        background: url("/examples/images/css-transparent.png") no-repeat;
    }
</style>
</head>
<body>
    <div class="box">
    	<img src="/path/images/css.png" alt="css">
    </div>
</body>
</html>
The rotate() Function
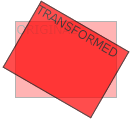
The rotate() function rotates the component around its origin (as defined by the transform-origin property) by the specified angle. This can be written as rotate(a).
<!DOCTYPE html>
<html lang="en">
<head>
<meta charset="utf-8">
<title>Example of CSS3 rotate() Method</title>
<style>
    img {
		-webkit-transform: rotate(30deg);
	}
    .box{
        margin: 50px;
        width:120px;
        height:110px;
        background: url("/examples/images/box.png") no-repeat;
    }
</style>
</head>
<body>
    <div class="box">
    	<img src="/examples/images/box.png" alt="box">
    </div>
</body>
</html>
FAQs:
1.What is <div>?
Ans: The Div is the most usable tag in web development because it helps us to separate out data on the web page.
tag defines division tag. The div tag uses in HTML to make divisions of content on the web page like (text, images, header, footer, navigation bar, etc). By using the div tag, we can easily style our page using id and class.
2. matrix(n,n,n,n,n,n) ________?
Ans: Used to defines matrix transforms with six values
3. 3D transform property is animatable. True or false?
Ans: False
4. rotateX(angle) ________?
Ans: Defines a 3D rotation along the X-axis
Very useful information..i like the way your explain gradients…looking forward to the next post
Useful information
Useful.. thanks for sharing
nice blog with good knowledge of html and css
Great work
Nice
Nice Contents